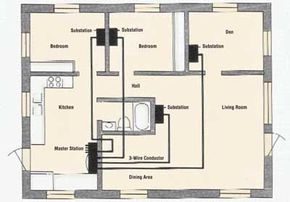
Start with a tape measure. You need to map out exactly where the units will live. The master station is the brain. It houses the electronics. It might also hold a radio or tape player. If you want music in every room, the master station is where the source lives.
Substations are simpler. They are just speakers and microphones. You switch between listening and talking with a lever or button. These fit into standard wall cavities. They are thin. Flush mounting is the goal.
Most homes can handle a modest intercom setup. It costs less than you think. You get paging, security at the front door, and maybe background music. It is not rocket science. You only need moderate carpentry skills. Some basic wiring knowledge helps. Newer wireless options exist, but we are talking about hardwired here.
“All parts of the built-in system — even the master station — are sufficiently thin so you can install them flush on a wall in holes cut into the wall space.”
Planning the Layout
Where does the master station go? Somewhere convenient. A kitchen? A hallway? The master station controls everything. Power. Radio. Call selection. You call one substation at a time. Or all of them. The one you call answers. When you press push-to-talk, the radio cuts out. That is standard operation.
Elaborate systems offer more. Monitor any room. Privacy modes. Substation-to-substation calls. But let’s stick to the basics for now. One master. Several indoor units. One outdoor unit. The outdoor unit usually sits by the front door. It has the doorbell button.
Cutting Openings
Measure twice. Cut once. This is the golden rule of carpentry. You need to cut openings for the master station and each substation. The holes must fit between the wall studs. Check the dimensions of your specific unit. They vary.
Height matters too. Don’t install them too high. You want them at a comfortable reach. Use a stud finder. Avoid hitting wires or pipes. Mark your cuts clearly. Use a keyhole saw or a jab saw. Cut carefully.
If you are installing an outdoor substation, you will need to run the cable through the exterior wall. Seal it well. Weatherproofing is not optional. Rain does not mix well with electricity.
Running the Cables
This is the tedious part. But it makes the system look clean. Run all cables from the substations back to the master station. Hide them. Use the attic, basement, or crawl space. It is much easier to fish wires through open spaces than through finished walls.
Label every cable. At both ends. Use painter’s tape and a marker. Write “Kitchen,” “Master Bedroom,” etc. If you don’t label them, you will forget. You will pull the wrong wire. You will waste hours.
Use the right wire. Most intercom systems use a specific gauge. Check the manual. Usually, it is a multi-conductor cable. You need enough conductors for the number of substations. More substations mean more wires.
Route the cables along the floor joists if you are in a basement. It keeps them tidy and out of the way of foot traffic. Don’t staple them too tightly. Leave a little slack.
Installing the Units
Pull the cables through the wall openings. Connect them to the terminals on the back of each unit. Follow the color codes. Red to red. Black to black. It is usually straightforward. But double-check the wiring diagram.
Mount the units into the wall. They should sit flush. Secure them with the provided screws. Connect them to the power supply. This is often a transformer that plugs into an outlet.
Testing and Safety
Before you close up any walls or cover any panels, test everything. Turn on the power. Call each substation. Listen for clarity. Check the radio function if you have one.
If a unit doesn’t work, check the connections. Is the cable loose? Is the wire broken? Replace any defective units. Check the batteries if your substations are battery-powered. Some systems use batteries for backup or for the outdoor unit.
“Replace any defective units or batteries as needed.”
Safety first. Turn off the power at the breaker before handling any wires. Electricity is unforgiving. It doesn’t care if you are careful. It only cares if you are wrong.
This process works for a small home. One master and four substations cover a lot of ground. The same principles apply to a larger house. You just add more wires. More holes. More labeling.
The hard part is over. The wiring is in. The units are up. You have a functional system. It talks. It listens. It connects you to your home.
Prep the Walls and Locate the Master Station
Start by grabbing the master station box. You need to figure out exactly how big an opening to cut. Look at the bracket or flange the manufacturer included. It will have holes for mounting screws inside the wall.
Find the studs. You’re cutting between them, not into them. Measure the height. Five feet off the floor works for most people. It’s a safe middle ground. Use a pencil to mark the shape on the drywall.
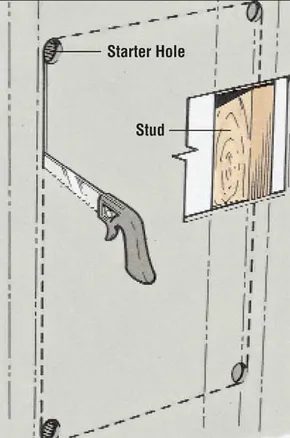
Drill three-eighths-inch holes at the four corners of that mark. Take a keyhole saw or a saber saw to cut the hole. Test fit the box. Trim the edges if it’s tight. Set it aside for now. You aren’t done with the walls yet.
Cut Openings for Substations and Plan Your Wiring
Cut holes for each substation. They should match the size of their units. Try them in. Trim as needed. Set them aside too. You need to run wire first.
Check the wiring diagram. Usually, only the master station connects to your house power. The substations get their signal and power from multiwire cable linking them back to the master. If your kit doesn’t have enough wire, buy it. Go to a radio-electronics parts supplier. Ask for intercom cable with the right number of conductors. Get one with a jacket covering the wires.
Run the Cables Through the Attic or Basement
Run a separate cable from each substation back to the master station. Keep it neat. Run the wire down inside the wall into the basement. Or up through the attic. Pass it through holes in the joists. Keep it alongside the joists to a hole leading into the wall space for the master station.
You need a bigger entry hole in the floor space below the master station. All those wires are coming together there. Maneuver each cable up to that opening. Label them immediately. Use numbered pressure-sensitive tape. Know which wire goes to which room.
Terminate the Connections at Each End
At each substation, connect the three wires to the terminals. Follow the color code stamped next to the screw terminals. Don’t guess. Fasten the substation to a wall stud. Attach the trim molding around the perimeter. It hides the ugly cut in the drywall.
Warning: If the master station plugs into your home’s electrical system, cut the power. Turn off the circuit breaker. Make sure no one flips it back on while you’re working. If there’s a transformer, put it near a junction box or main panel. Connect it to the power after you’ve killed the circuit. Follow the manufacturer’s instructions exactly.
At the master station, attach all the substation wires and the power line. Match the markings on the terminal connections. Mount the master station firmly into the wall studs. Add the trim molding. Restore power.
Test and Troubleshoot
Turn it on. Test the system. Call from one room. Answer in another. If a substation fails, check the terminal connections. Check the wires going back to the master.
Suspect a bad unit? Replace one substation with a known good one. If the problem moves, you have a wiring issue. If it stays, the unit is defective.
If you use battery-powered subs, check the batteries. Note the date you changed them. Write it inside the cover. Don’t let them die unexpectedly.
Maintaining Your System
Intercoms fail. Blown fuses happen. Bad wires happen.
You can integrate some modern intercoms with home automation or security systems. Check compatibility before buying.
Maintenance is simple. Replace batteries regularly. Check connections. Clean the components. Dust builds up and causes problems.
Whether you want security, background music, or just a way to yell at the kids for dinner, this setup works. Follow these steps. Get it done.