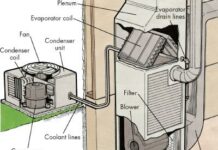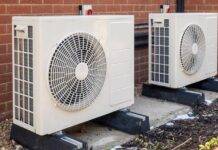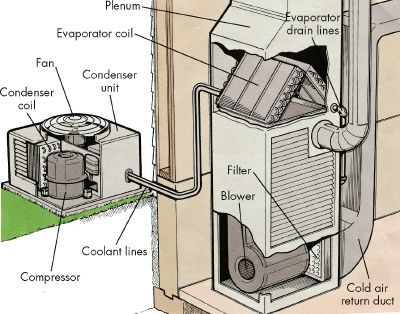
Your central AC isn’t just one box. It’s two distinct units working in tandem. You’ll find the condenser outside. It sits on a concrete slab, absorbing heat from the air. Inside, the evaporator coil lives in the plenum or main duct junction above your furnace.
Most homes rely on a forced-air distribution system. That means your heating and cooling share the same infrastructure. The same blower motor moves warm air for winter and cool air for summer. The same ductwork carries both. This shared system is efficient until it breaks.
The Airflow Cycle
Here is how the process should work. Hot air inside your house gets pulled back into the home. It travels through the return-air duct. The blower pushes this air across the cooled evaporator coil. The air drops in temperature. It then moves through the supply ducts to cool your rooms.
Simple, right?
When Cooling Fails
So why does your air conditioner work but your house stays warm?
The problem usually isn’t the machine itself. It’s the distribution system. If the blower is running and the coils are cold, but the air isn’t cooling your space, look at the ducts. Are they blocked? Leaking? Poorly insulated?
When the air conditioner works but the house doesn’t cool, the problem is probably in the distribution system.
Check your return vents. Are they dusty? Blocked by furniture? A clogged filter can starve the system of air. This makes the coils freeze or just push warm air around. Inspect the ductwork for gaps. Sealed leaks improve efficiency dramatically.
DIY Diagnosis Steps
- Check the filter. A dirty filter restricts airflow. Replace it monthly during peak use.
- Inspect the blower. Is it actually running? Listen for the hum. Feel the air from the supply vents.
- Examine the ducts. Look for visible gaps or disconnected sections. Seal them with mastic tape.
- Verify the thermostat. Is it set to “cool”? Is the fan on “auto” or “on”?
If the air is blowing but not cold, focus on the path the air takes. The machinery might be fine. The delivery might be failing.
Why Central AC Needs More Than Just an Annual Check
Your central air conditioner isn’t one single box. It’s a partnership between two sealed components. The condenser sits outside on that concrete slab. The evaporator coil hides above your furnace inside the house. Because these systems are sealed, you can’t just pop the lid and tweak it like a toaster. You need a pro for most repairs.
Still, that doesn’t mean you’re helpless.
There are specific maintenance steps you can take. They keep the system running efficiently. Most importantly, they prevent the big repairs. But first, safety. Always turn off the power to both the condenser and the evaporator assembly before touching anything. A dead compressor is expensive. A dead homeowner is worse.
Troubleshooting Your Central AC Unit
Not every issue requires a service call. Some problems are simple. Look at what’s happening. Then match it to the likely cause.
The condenser won’t run.
Check your main electrical panel. Are there blown fuses or tripped breakers? Restore the circuit. Sometimes the fix is that simple. If the power is on, check the thermostat. Is it set too high? Lower it by five degrees. If the motor or compressor is faulty, call a professional. Don’t try to fix a bad compressor yourself.
The house isn’t cooling evenly.
Your air distribution system might be out of balance. This often happens in older homes with long duct runs. You may need to balance the system by adjusting dampers or vents.
The unit runs but doesn’t cool effectively.
Start with the thermostat. Drop it five degrees. If it’s still warm inside, check the filters and coils. A dirty evaporator coil stifles airflow. Clean it. A dirty condenser coil on the outside unit does the same. Clean that too. If the condenser is blocked by weeds or vines, clear the debris. Trim it back. Sometimes the unit is simply too small for the space. If cleaning doesn’t work, the unit might be undersized. That’s a job for a pro to replace.
The condenser cycles on and off repeatedly.
This is often a sign of overheating. Why? Dirt. Clean the condenser coil and fins. Straighten any bent fins with a fin comb. Clear away any vegetation blocking airflow. Check the evaporator as well. A dirty evaporator restricts heat exchange. Clean it.
How to Clean an Accessible Evaporator Coil
A dirty evaporator is a silent killer of efficiency. It forces the system to work harder. It can also freeze up. Accessing it depends on your setup.
The evaporator sits in the plenum above the furnace. If your plenum has foil-wrapped insulation at the front, you might have access. If it’s a sealed sheet metal box, stop. Do not try to open it. You could release hazardous materials or damage the seal.
If you have access, follow these steps.
Step 1: Remove the insulation and access plate
Peel back the foil-wrapped insulation. It’s usually taped. Be careful. You’ll need that tape later. Behind the insulation is an access plate. It’s held by screws. Remove them. Lift the plate off.
Step 2: Brush the evaporator
Use a stiff brush. Clean the entire underside of the unit. It’s dark in there. Use a hand mirror to see what you’re missing. If you can’t reach the back, slide the evaporator out slightly. It can come out even with rigid pipes attached. Go slow. Do not bend the pipes. Bent pipes mean refrigerant leaks. That’s a professional call.
Step 3: Treat the condensate tray
Below the evaporator is a tray. It catches water. Pour one tablespoon of household bleach into the weep hole. This kills fungus and algae. If the weather is extremely humid, check this pan every other day. If it’s full of water, the drain line is clogged. Stick a piece of wire into the weep hole to clear it.
Step 4: Reassemble
Slide the unit back into place. Screw the plate on. Tape the insulation back over it. It doesn’t need to look pretty. It needs to be sealed.
Step 5: Test for leaks
Turn the power back on. Turn on the AC. Check for air leaks around the plenum. Seal any gaps with duct tape. Leaky ducts waste cooled air.
The Condenser Needs Love Too
You’ve handled the inside. Now look outside. The condenser coil gets clogged with dirt, grass clippings, and pollen. This restricts airflow. The compressor overheats. The system shuts down.
Cleaning the condenser is straightforward. Turn off the power. Remove any debris by hand. Use a garden hose to spray the fins. Spray from the inside out if possible. This pushes dirt out, not in. If the fins are bent, straighten them. Don’t bend them further.
After cleaning, check the area around the unit. Keep it clear of vegetation. Give the unit breathing room. At least two feet of clearance is ideal.
If you’ve cleaned both coils. If you’ve checked the filters. If you’ve balanced the ducts. And it’s still not cooling? Then the problem is deeper. Refrigerant levels? Compressor health? Call a pro. You’ve done your part. The rest requires specialized tools and knowledge.
Clear the Debris and Check Airflow
Most condensers live outside. They gather dirt. Dust. Leaves. Lawn clippings. The fan pulls air across the coil. You need clean intake.
Check the airflow direction first. Turn off the power. Look at the fan. See where the air goes in.
-
Trim vegetation. Cut back grass. Pull weeds. Remove vines. Give the unit space. Airflow needs room to breathe.
-
Apply coil cleaner. Buy commercial coil wash. Refrigeration supply stores carry it. Follow the label. Do not use a garden hose. Water turns dirt to mud. It clogs the fins. Flush the coil with the cleaner. Let it dry.
-
Brush the fins. Use a soft brush. Remove dirt gently. You might need to take off the protective grille. Aluminum fins are thin. They bend easily.
If fins are bent, use a fin comb. Appliance parts stores sell them. Slide it between the fins. Be careful.
- Level the pad. Check the concrete base. Use a carpenter’s level. Front to back. Side to side. If it settled, lift the unit. Use a pry bar or a 2×4. Slide gravel or rocks underneath. Make it level.
Protect the unit in winter. Leaves block airflow. Ice damages components. Use a commercial cover. It fits the shape. Heavy plastic sheeting works too. Secure it with sturdy cord.
When to Call a Pro: Refrigerant Issues
If you cleaned everything and still have no cool air, check the refrigerant. Most systems use Freon. The amount matters. Low Freon means no cooling.
Do not try to recharge the system yourself. Call a professional. Handling refrigerant requires certification. It’s dangerous and illegal to bypass this step.
You can, however, fix the lines. Inspect the coolant lines. They run from the outdoor condenser to the indoor evaporator. Check the insulation. If it’s worn or torn, efficiency drops. Replace it soon.
Buy new insulation. Match the type. Follow the manufacturer’s instructions. Install it tightly. This small fix helps the system work harder.
DIY vs. Professional Help
You know when to DIY. You know when to call. Cleaning coils is easy. Recharging gas is not.
Save money on maintenance. Call pros for refrigerant leaks. Your unit will last longer. You’ll stay cool.
For more repair tips, look into room air conditioners. Window units have different rules. Check appliance repair guides too. Fix your other machines.
Check your thermostat. Make sure the problem is the AC. Calibrate it. Test it before tearing down the whole system.
Start small. Stay safe.